How To Setup - Gemini Enterprise MCP Connection
 Updated
by Josh Gray
Updated
by Josh Gray
This article runs through how to add Insightech as a custom MCP server in your Gemini Enterprise app, so your team can ask questions about your website analytics in plain language — sessions, conversions, page and form performance, errors, user journeys — directly from Gemini.
Who Is This Guide For
- Users - Anyone on your team who will use Gemini with Insightech
- Your Google Cloud Admin - This user needs Organization Policy Administrator Rights to set up your MCP server connection
Time required: about 20 minutes, mostly the one-time admin setup (Steps 1 – 5). Each user's own sign-in (Step 6) takes under a minute.
Before You Begin
Requirement | Detail |
Gemini Enterprise edition | Standard, Plus, or Frontline. Business edition doesn't support custom MCP servers |
Google Cloud project | The project your Gemini Enterprise app lives in |
Admin rights |
|
Insightech account | Every user needs their own login. You'll only ever see the profiles your account already has access to |
Insightech needs no access to your Google Cloud environment — this is a standard OAuth 2.1 connection to a public Insightech endpoint.
Where Insightech Will Live in Gemini Enterprise
Gemini Enterprise organises everything into apps. Each app has its own web link and its own set of connectors. When someone opens an app, the connector list shows everything attached to that app.
When You Already Have A Gemini Enterprise App
Add Insightech as an additional data store in your existing app. Your team keeps the same link they already use, and Insightech appears alongside your other connectors in the connector list, all usable in the same conversation.
You do not need a new app, and you do not need a second link. Continue to Step 1 of the Admin Steps - Setting Up Your MCP Connection
When You Don't Have A Gemini Enteprise App
If you don't have an app yet, you will need to create one first.
Here are the steps to create a Gemini Enterprise App:
- Go to Apps → Create.
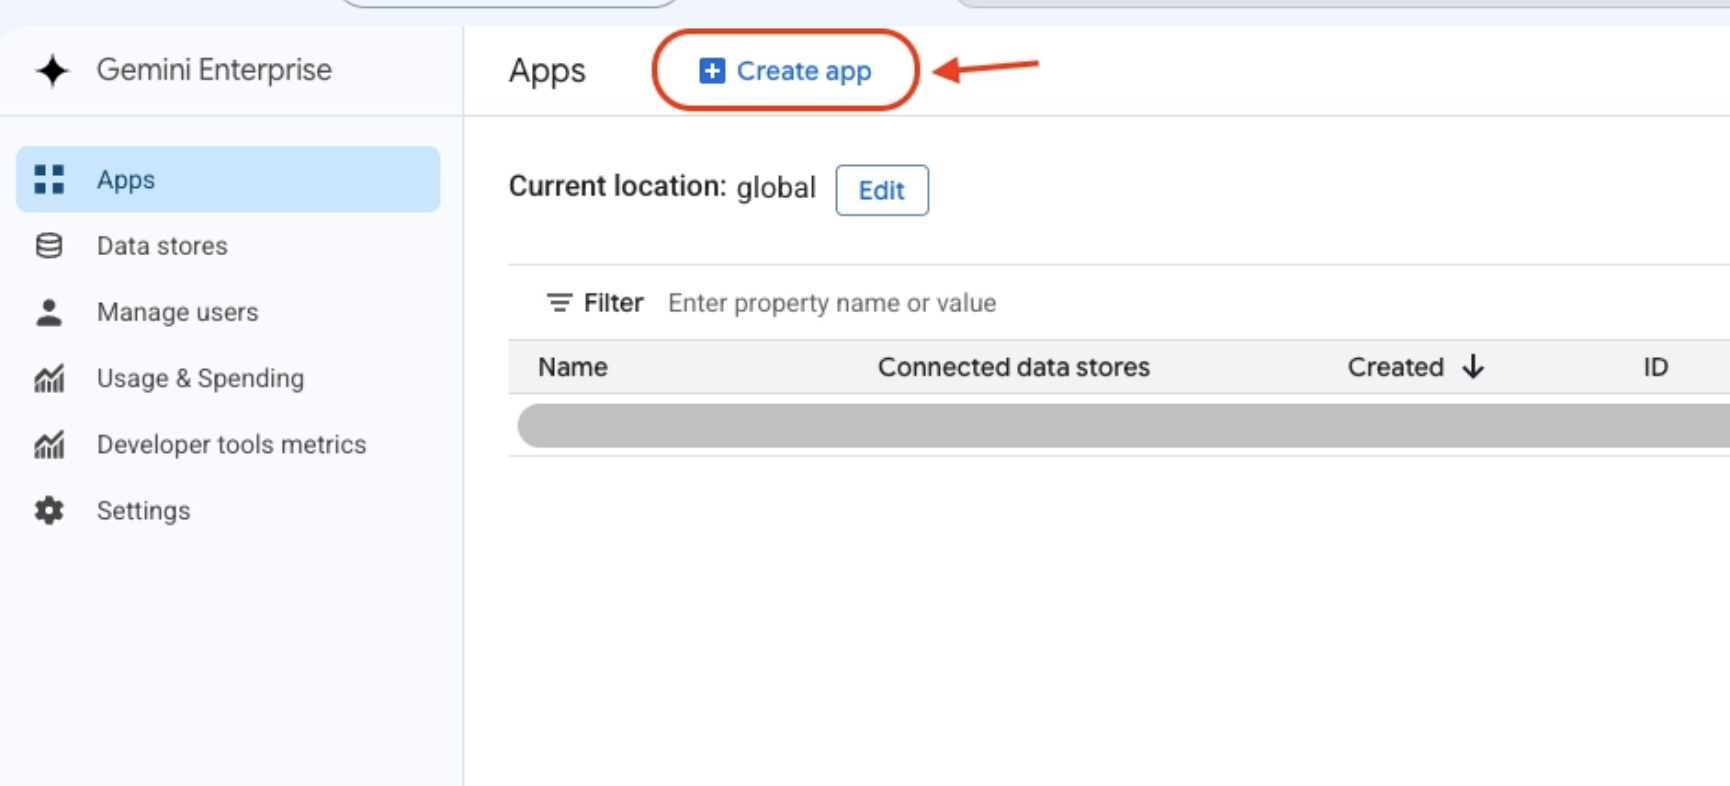
- Give it a display name and choose
globalas the location, unless you have a specific compliance reason not to — this can't be changed later.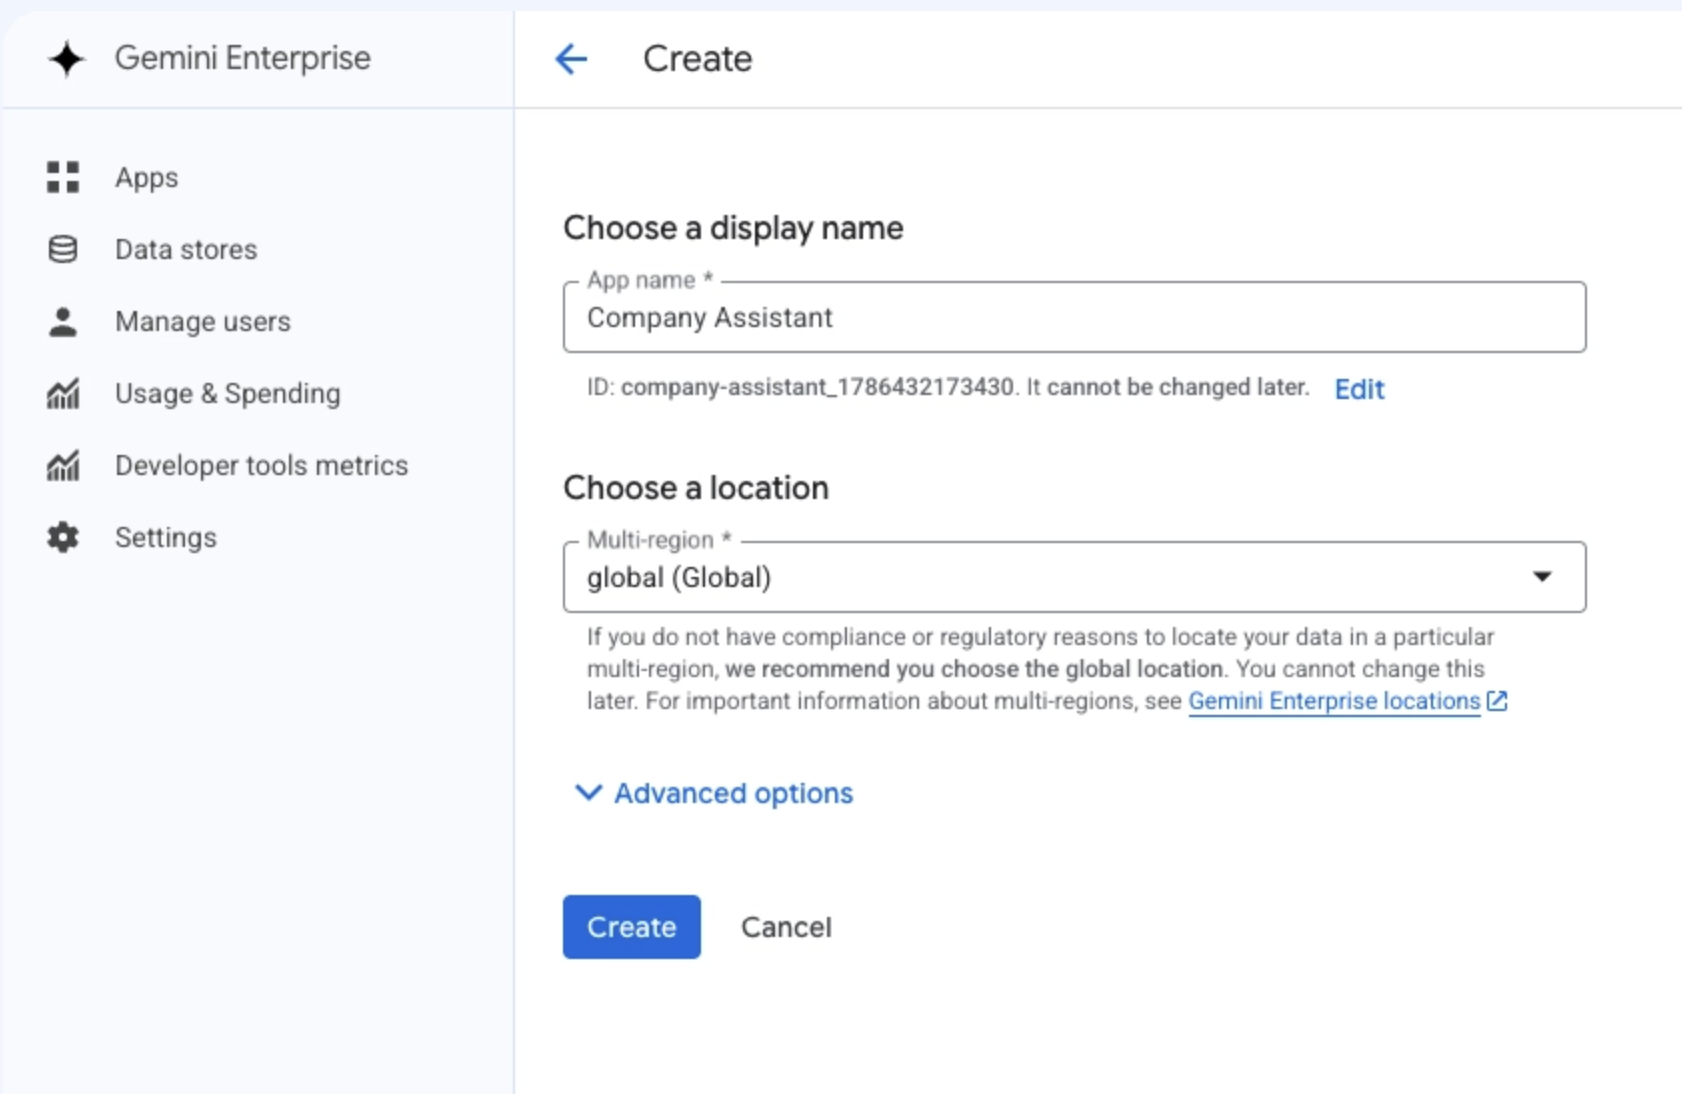
- Continue to Step 1 of the Admin Steps - Setting Up Your MCP Connection
Using Insightech Along Other MCP Servers
You can attach several MCP servers to the same app. Each appears as its own entry in the connector list, with its own on/off toggle, and Gemini can draw on more than one within a single conversation. A separate app or link per MCP server is not required.
One exception — connecting Insightech for more than one data region. If your organisation has Insightech data in multiple regions, use a separate app per region. Both connectors expose tools with identical names, so within a single app the assistant cannot reliably tell which region you mean. Keeping them in separate apps removes the ambiguity.
Your Connection Details
Field | United States | Australia |
MCP server URL |
|
|
Authorization URL |
|
|
Token URL |
|
|
Common to both regions | Value |
Client ID |
|
Client secret | (leave blank — Insightech doesn't use one) |
Scopes |
|
Enable PKCE support | Checked |
Use HTTP basic authentication | Unchecked |
Authorization URL parameters | (leave empty) |
Use one data store per region if you have data in more than one.
Admin Steps - Setting Up Your MCP Connection
Step 1 - Allow custom MCP connectors
Google Cloud blocks custom MCP connectors by default — this is the most common setup blocker, so do it first.
- Go to IAM & Admin → Organization Policies, and confirm your project is selected.
- Filter for
disableCustomMcpServerConnector, then open it. - Click Manage policy → Override parent's policy.
- Add a rule with Enforcement: Off.
- Click Set policy.
You only need to scope this to the single project that hosts your Gemini Enterprise app. There is no need to change the policy organisation-wide.
If Your Organisation Uses VPC Service Controls
Skip this unless you know your organization uses it.
Two additional constraints will apply only when VPC-SC is enabled, or when your project is listed in a constraint's enforcedProjects. If neither is true, you don't need to complete this section.
- Add your region's host (e.g.
us.mcp.insightech.com) to thediscoveryengine.managed.allowedEgressFqdnsconstraint - Add
custom_mcptodiscoveryengine.managed.allowedDataSources.
If your organisation is using VPC Service Controls and doesn't have these details added, creating the data store in Step 3 will fail.
Step 2 - Set up access control (once per project)
Skip this if you've already connected another data store in this project before.
If you haven't connected another data store, you will see a banner about configuring access control.
- Start Step 3. If you see a banner about configuring access control, click it.
- Choose Google Identity (if your team signs in with Google Workspace).
- Save, then click Reload and continue to Step 3.
This is a project-level setting and applies to all data stores, so you will only do it once. Note that access is granted identity-provider-wide: Gemini does not offer per-user access control inside the app. Per-user data access is still enforced by Insightech (see Security and privacy).
Step 3 - Create the Insightech data store
- In your app, go to Connected data stores → Create data store.
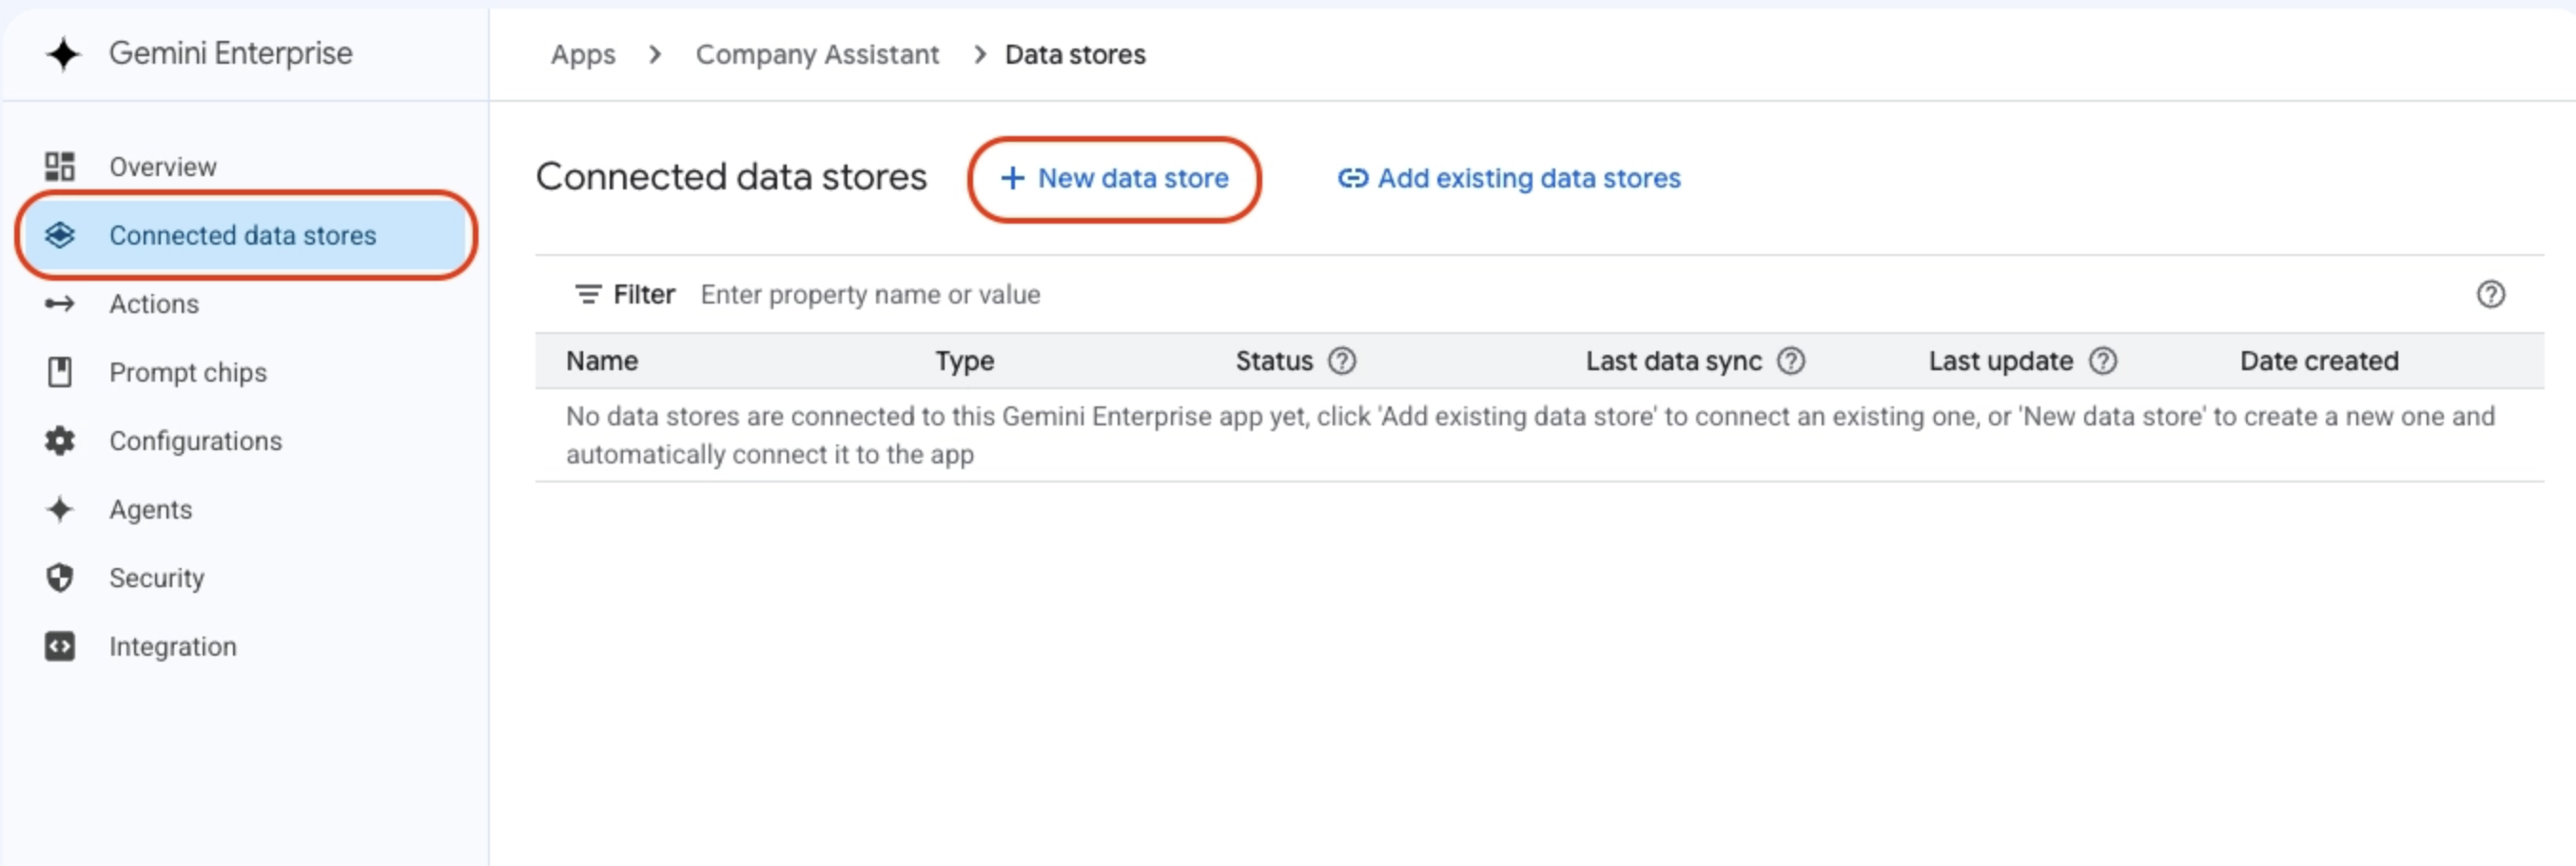
- Choose Custom MCP Server, then OAuth 2.0 as the authentication method.
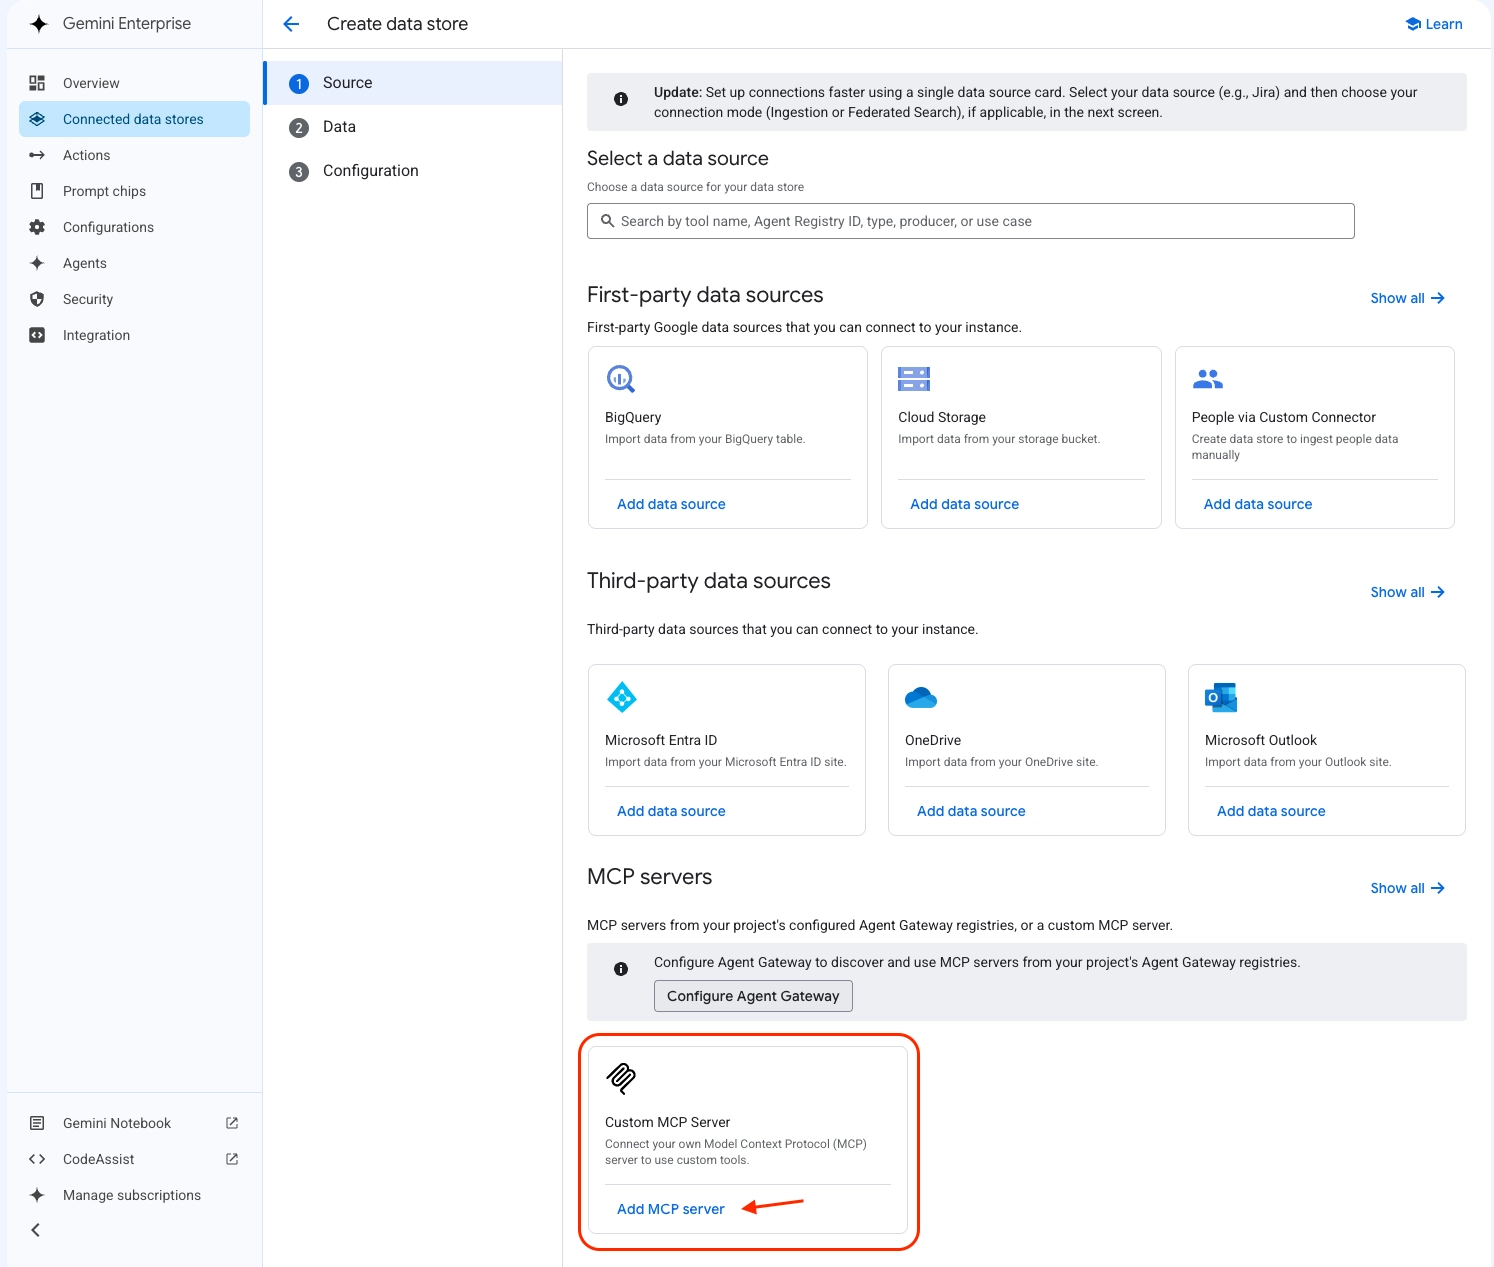
- Fill in the fields from Your connection details above. Make sure to double check the following fields:
- Enable PKCE Support must be checked (this hides the Client Secret field — expected).
- Use HTTP Basic Authentication must be unchecked.
- Authorization URL Parameters must be left empty.
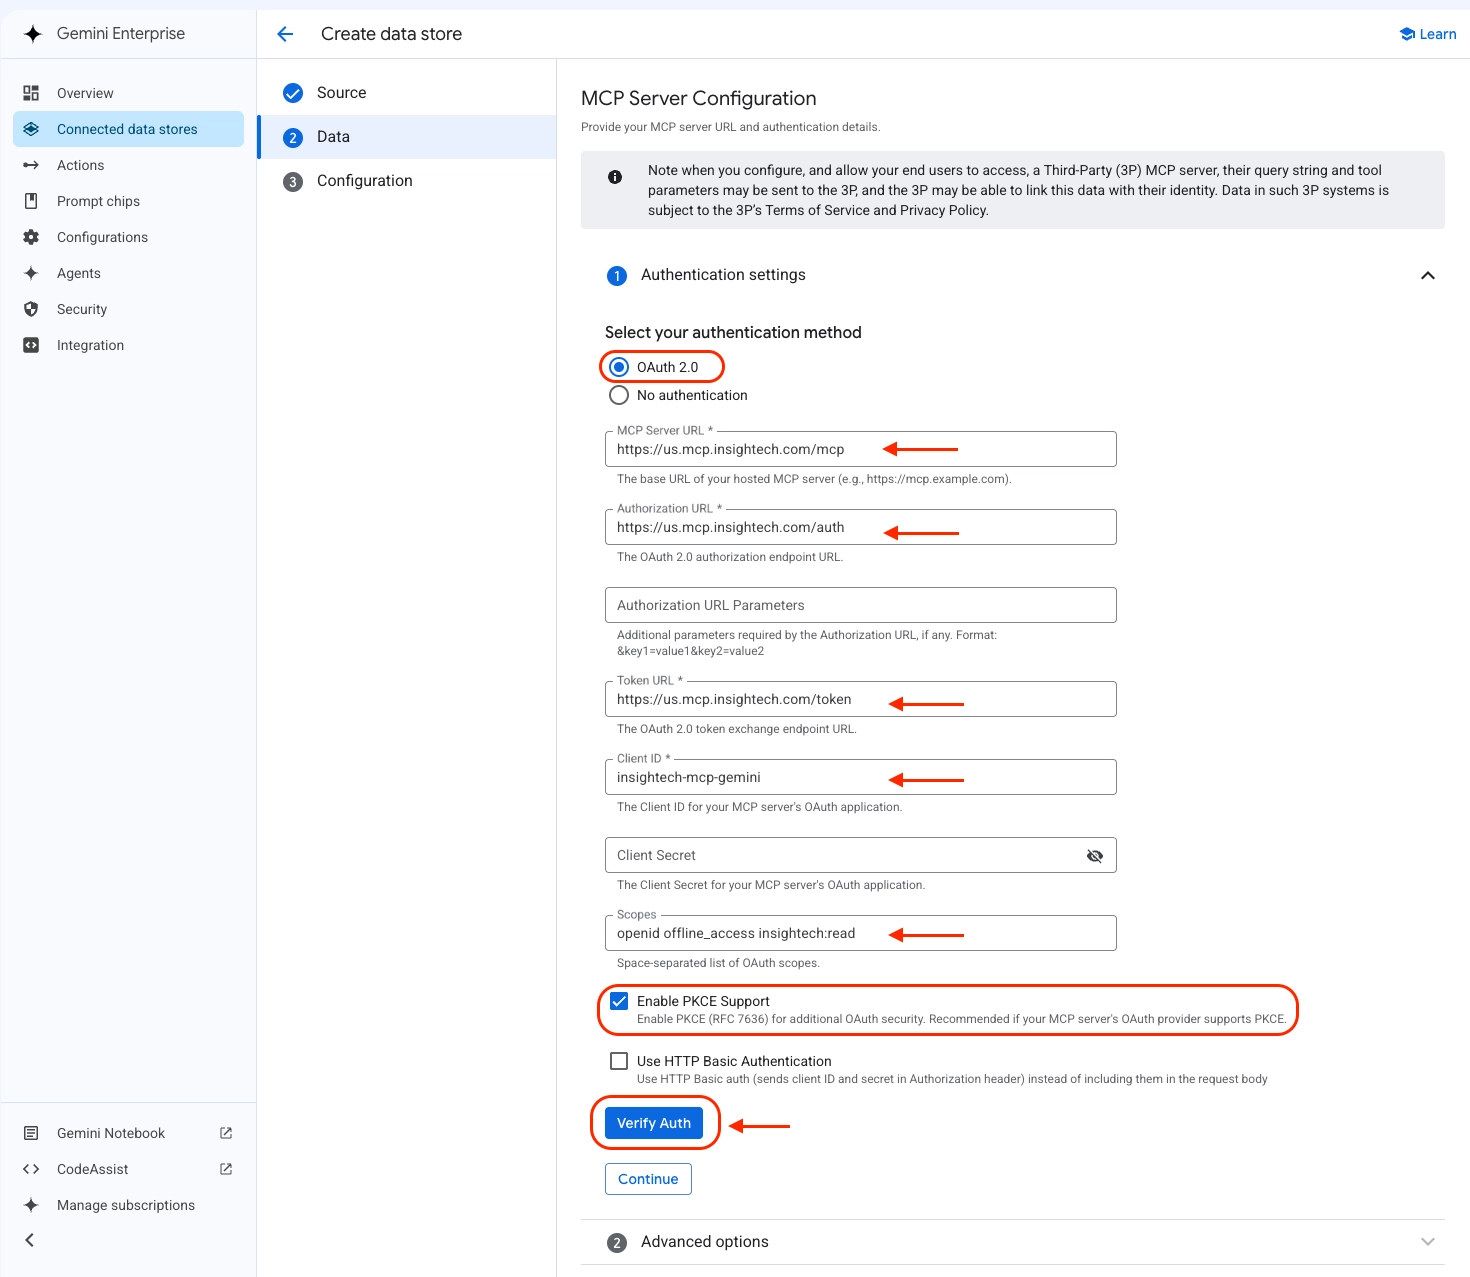
- Click Verify Auth, sign in with your Insightech account, and confirm you see "Successfully logged in."
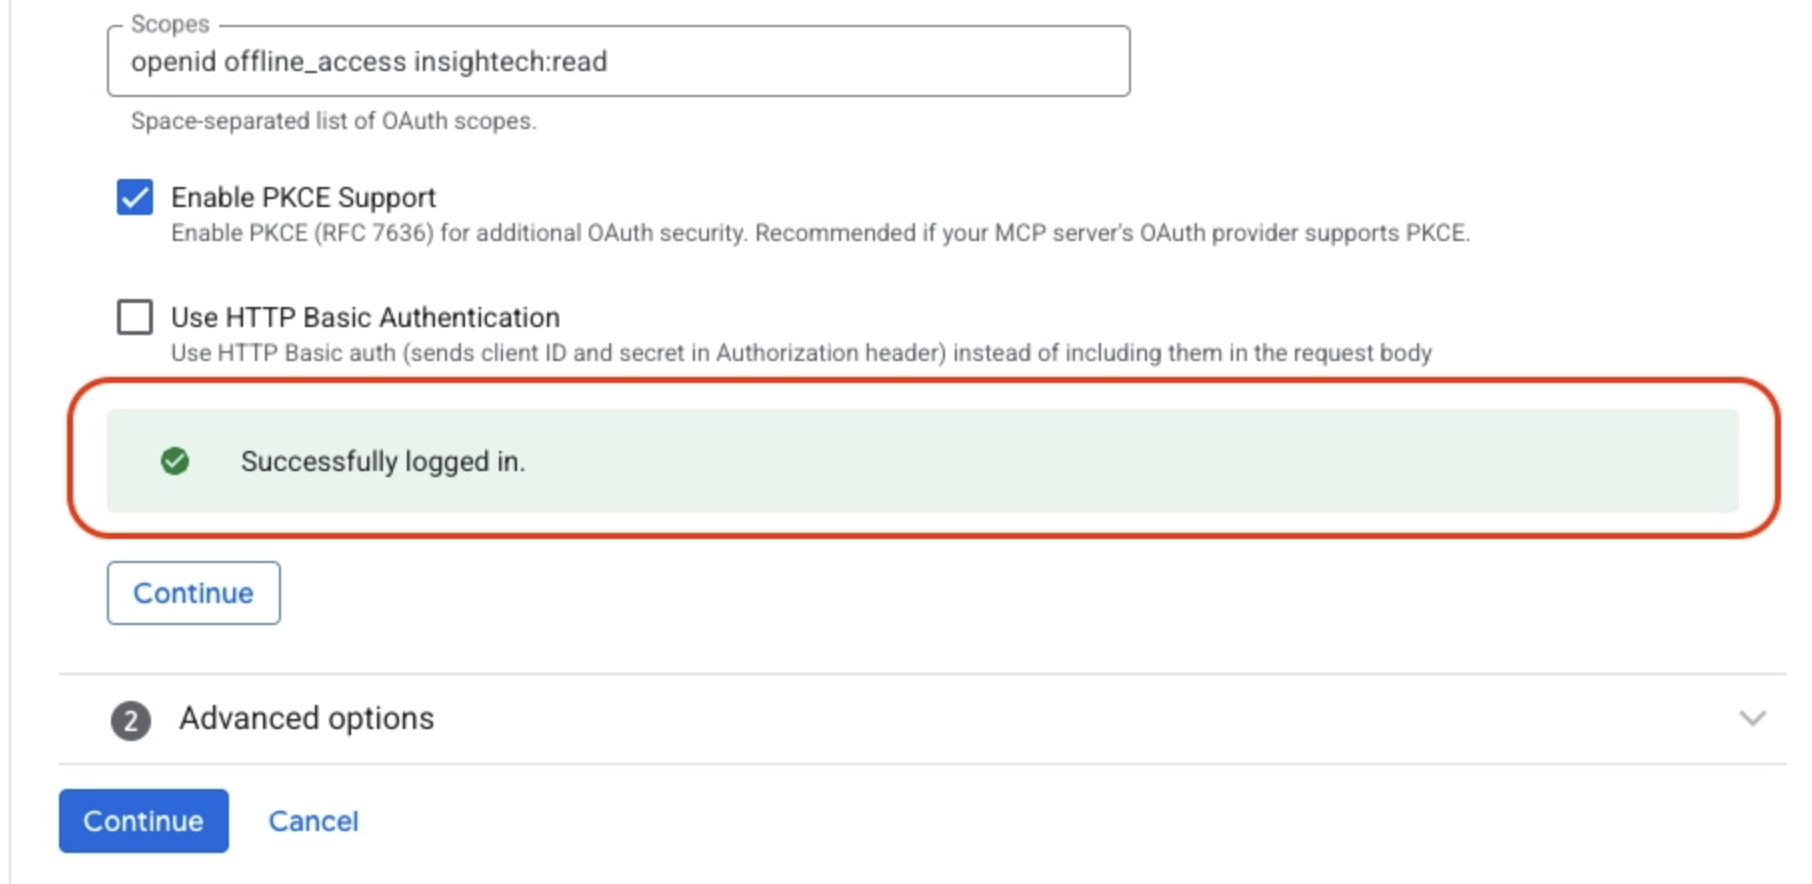
- Click Continue, name the connector (e.g.
Insightech MCP US), and click Create.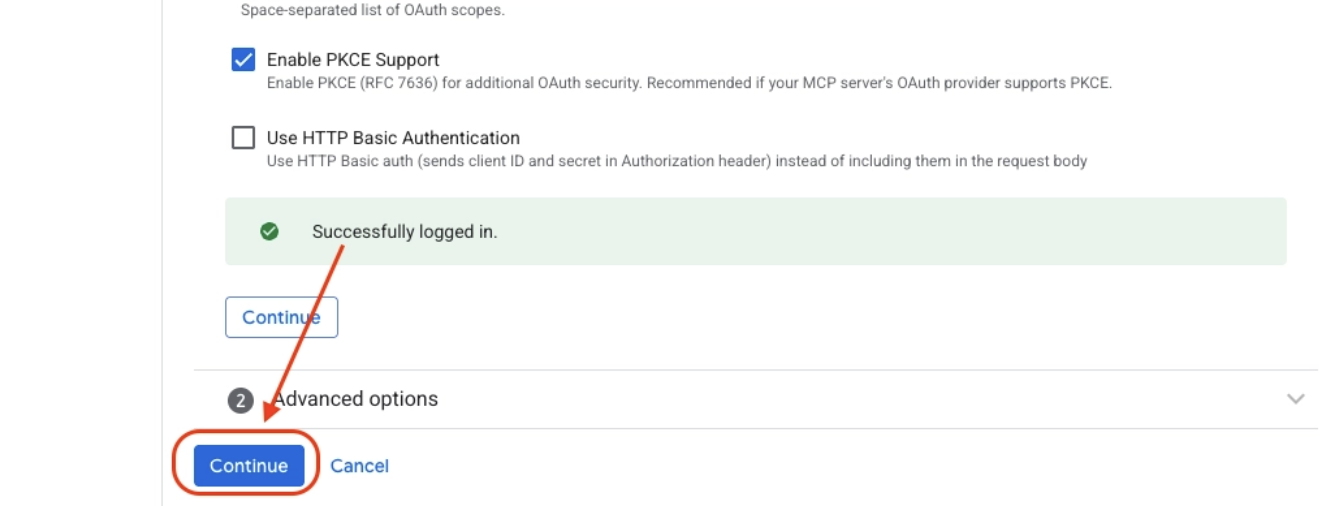
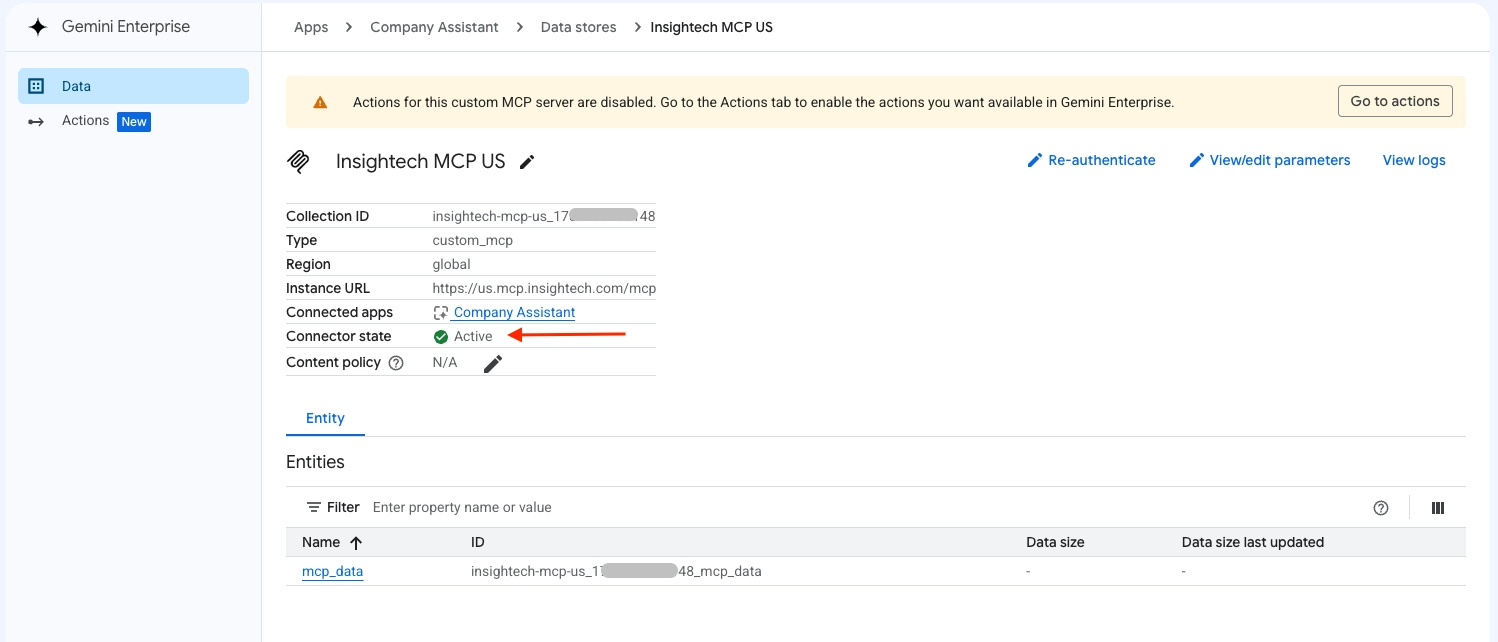
- Wait for Connector state: Active — can take a few minutes.
Three fields trip people up: Enable PKCE support should be checked (that's what hides the Client Secret field), Use HTTP basic authentication should be unchecked, and Authorization URL parameters should stay empty.
Step 4 - Turn on the Insightech tools
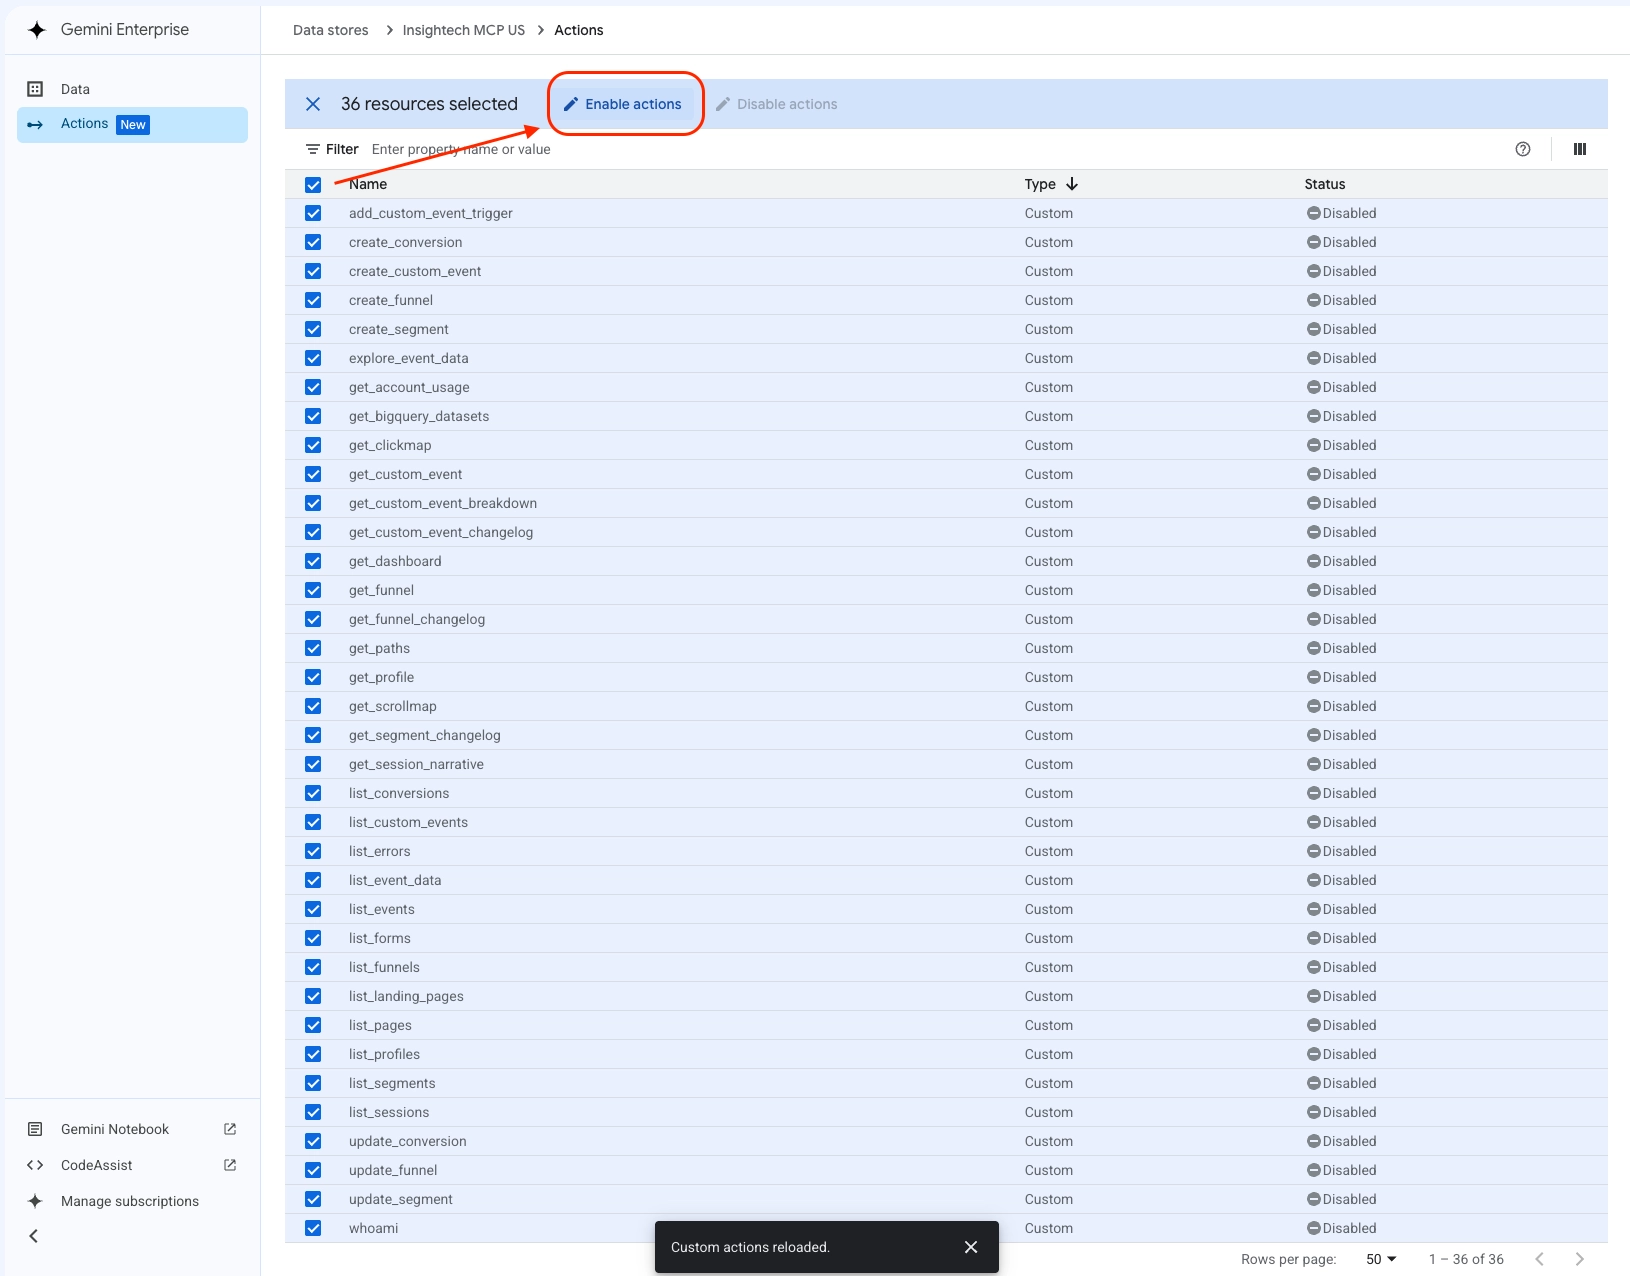
New connectors start with everything switched off. You will need to turn these on so you can start using the MCP connection.
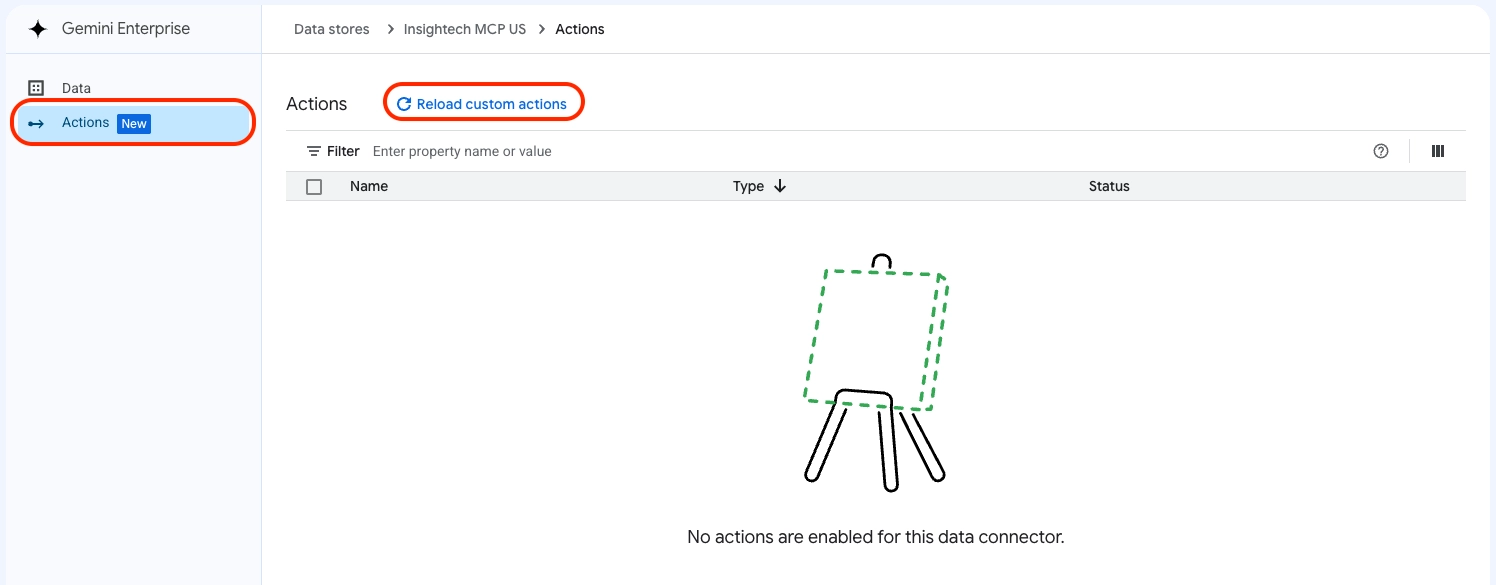
- Open the connector's Actions tab (click Reload custom actions if the list is empty).
- Select all the Insightech tools and click Enable actions.
Step 5 - Give Your Team Permission To Use The App
Before your team can use the app, two things need to happen for each person. If you skip either one, they'll see the same error message — so it's easy to miss which one is the problem. Make sure you do both.
- Turn on their "permission to use the app"
Think of this like giving someone a key to a building. Without it, they can't get in, even if they have a badge.- Option 1 - The Easiest Way
Go to your app's Integration tab and click the Grant permissions button. This lets you add people or a group with a couple of clicks — no technical steps needed. - Option 2 - The Technical Alternative (if you prefer the command line):
- Option 1 - The Easiest Way
Step 6 - Provide A 'Seat' or License To Use The App
This is separate from the permission above — think of it like a subscription seat. Even with the key to the building, they still need an active membership to use what's inside.
- Go to Manage users and assign a seat to each person who needs one.
- Share the app with them
- Go to Integration → Web App to get the link to share.
- If the web app isn't turned on yet, flip it on first — then the link will appear.
- Send that link to your team so they can start using the app.
Once you have shared the link, your team will be able to start accessing the App through that link to use with their Insightech data.
User Steps - Authorising Your MCP
- Open the app link your admin shared with you.
Here is where they can find the link: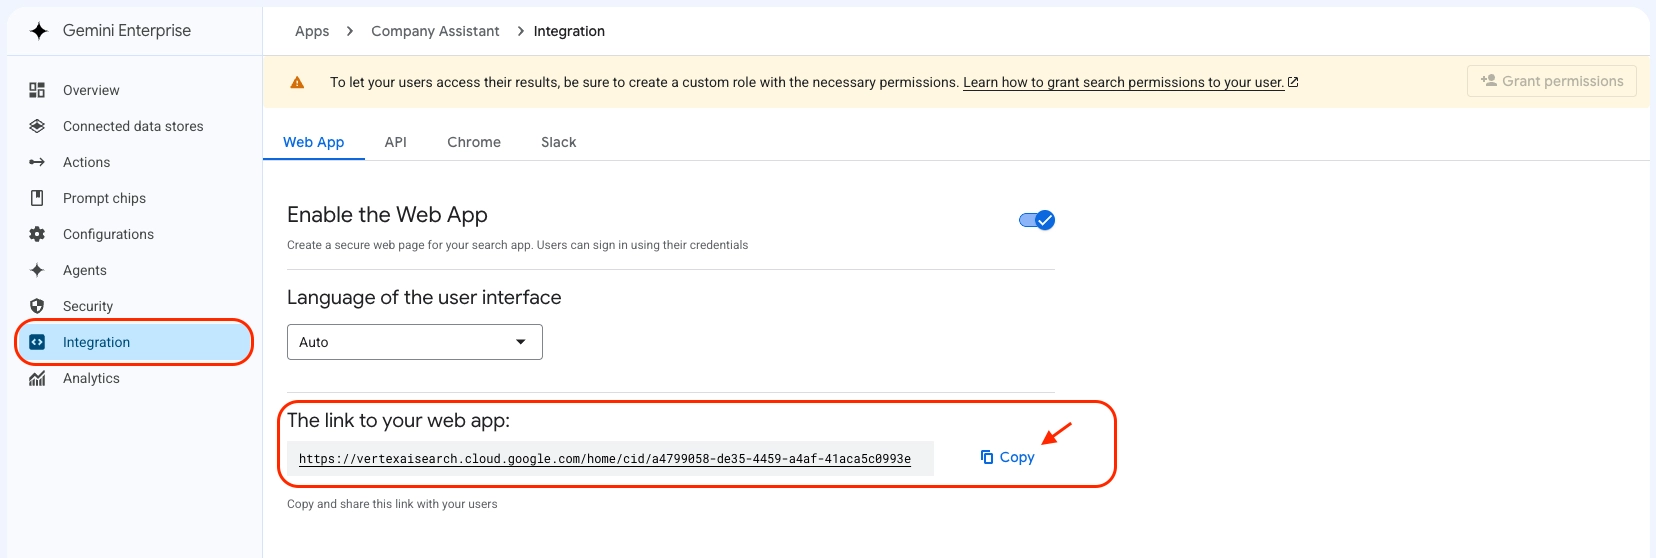
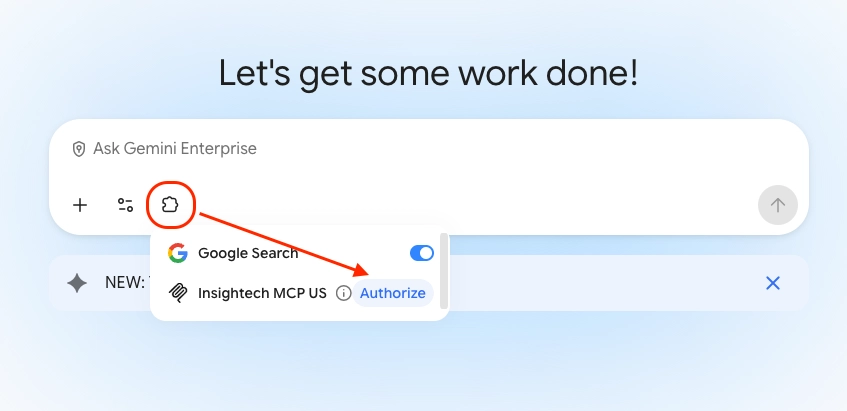
- Click the Connector icon in the chatbox, then Authorize next to Insightech. Sign in when prompted.
- Try asking something, like "List my Insightech profiles" or "How many sessions did we have last week?"
Troubleshooting
Symptom | Most likely cause and fix |
Connector's on, but Gemini says the tool is "currently unavailable" | You haven't authorized it yet. Click Authorize next to Insightech and sign in — turning the connector on isn't the same as authorizing it |
Verify Auth fails, or the sign-in window closes with an error | Admin Steps - Step 1's policy change hasn't taken effect yet. Confirm it shows Not enforced, then retry in a private/incognito window |
Creating the data store is denied | Only relevant with VPC-SC — see the callout in Admin Steps - Step 1 |
Actions list is empty | Reload the page and click Reload custom actions again |
A user can't open the app | Check they have both |
Connector stops working after inactivity | Open it and click Re-authenticate (see the button in the Step 3 screenshot above) |
Anything else — wrong region, no results, revoked accounts — see the shared Troubleshooting guide.
Security & Privacy
Each user authenticates individually with their own Insightech account — Insightech never receives your Google credentials, and access is scoped to what that user's account already has.
→ Full detail in Security & Privacy.
Removing the integration: delete the data store from your Gemini Enterprise project, and ask your Insightech representative to revoke sessions for anyone who needs it invalidated immediately.
What You Can Ask About
Once connected, see the Usage & Key Concepts Guide for the full range of what you can ask.
Getting More Help
Contact your Insightech representative or support@insightech.com, with your project ID, the region you configured, and what went wrong.