Insightech and Shoplift

Overview
Shoplift is a leading solution for building and measuring A/B testing campaigns. It is extremely effective in measuring the statistical success of improvements you make to your website.
This document explains how to integrate Shoplift A/B testing data with Insightech by pushing test variant information into the website's dataLayer.
What This Integration Does
The integration automatically captures and sends Shoplift A/B test data to your dataLayer whenever a visitor loads a page, allowing Insightech to automatically capture these details.
This includes:
- Test ID - Which A/B tests are running
- Variant ID - Which variant each visitor is seeing
- Visitor information - Device type, country, and unique visitor ID detected by Shoplift
- Timing data - When the visitor was assigned to each test
This integration allows Insightech to automatically segment A/B test data from Shoplift for session replays and dynamic click maps.
Implementation Steps
Add this code below to your theme's main Javascript file, or in a script tag in your theme.liquid file:
<script>
  // Wait for Shoplift to be available
  function initializeShopliftTracking() {
    if (window.shoplift && window.shoplift.getVisitorData) {
      pushTestDataToDataLayer();
    } else {
      // Retry if Shoplift isn't ready yet
      setTimeout(initializeShopliftTracking, 100);
    }
  }

  function pushTestDataToDataLayer() {
    // Initialize dataLayer if it doesn't exist
    window.dataLayer = window.dataLayer || [];

    const visitorData = window.shoplift.getVisitorData();

    // Push individual test events
    visitorData.visitorTests.forEach(test => {
      window.dataLayer.push({
        event: 'shoplift_ab_test',
        testId: test.testId,
        variantId: test.hypothesisId,
        visitorId: visitorData.visitor.id,
        device: visitorData.visitor.device,
        country: visitorData.visitor.country
      });
    });

    // Optional: Push a consolidated event with all tests
    if (visitorData.visitorTests.length > 0) {
      window.dataLayer.push({
        event: 'shoplift_visitor_initialized',
        shoplift_visitor: {
          id: visitorData.visitor.id,
          device: visitorData.visitor.device,
          country: visitorData.visitor.country,
          activeTests: visitorData.visitorTests.map(test => ({
            testId: test.testId,
            variantId: test.hypothesisId
          }))
        }
      });
    }
  }

  initializeShopliftTracking();
</script>
Understanding the DataLayer Events
This integration pushes two types of events to the dataLayer:
Event 1: shoplift_ab_test
Fires once for each A/B test the visitor is enrolled in. This allows you to track individual test exposures.
// Event: shoplift_ab_test (fires once per A/B test enrolled)
{
  event: 'shoplift_ab_test',
  testId: 'test_abc123',
  variantId: 'hyp_def456',
  visitorId: '550e8400-e29b-41d4-a716-446655440000',
  utmSource: 'google',
  device: 'mobile',
  country: 'US'
}
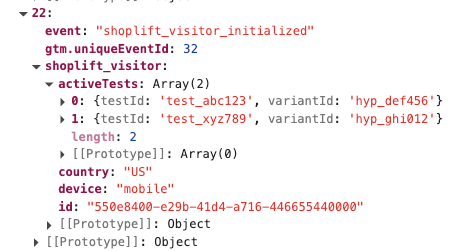
Event 2: shoplift_visitor_initialized
Fires once after all test data has been pushed, providing a consolidated summary of all active tests for the visitor.
// Event: shoplift_visitor_initialized (fires once after all tests pushed)
{
  event: 'shoplift_visitor_initialized',
  shoplift_visitor: {
    id: '550e8400-e29b-41d4-a716-446655440000',
    device: 'mobile',
    country: 'US',
    activeTests: [
      { testId: 'test_abc123', variantId: 'hyp_def456' },
      { testId: 'test_xyz789', variantId: 'hyp_ghi012' }
    ]
  }
}
Setting Up / Configuring Insightech
Once the integration is live, Insightech will automatically capture the dataLayer events being fired.
To segment your sessions by Shoplift A/B test data, create segments in Insightech using the following dataLayer JSON paths:
1. Shoplift - Event
Datalayer JSON Path = event
AND contains 'shoplift_ab_test'

2. Shoplift - TestId
Datalayer JSON Path = testId
AND contains '<your shoplift test ID>'

3. Shoplift - VariantId
Datalayer JSON Path = variantId
AND contains '<your shoplift variant ID>'

Click here for more information on setting up your dataLayer in Insightech.
To Verifying the Integration Is Working
- Open your website in a browser
- Open the browser's developer console (F12 or right-click > Inspect > Console)
- Type `dataLayer` and press Enter
- Look for `shoplift_ab_test` and `shoplift_visitor_initialized` events
- Verify the data structure matches the examples above
You should see the initial AB Test datalayer event

And also the visitor initialised event that will look similar to this:
If Events Are Not Appearing
Verify test is running:
- Open browser console and type `window.shoplift`
- Should return an object with the `getVisitorData` method
- If undefined, Shoplift may not be installed or loaded yet
Check for JavaScript Errors:
- Look for errors in the browser console
- Ensure the integration code is placed after Shoplift loads
Increase retry timeout:
- If Shoplift loads slowly, increase the timeout from 100ms to 200ms or 500ms
When There is No Test Data in Events
Verify test is running:
- Check Shoplift dashboard to confirm tests are active
- Ensure visitor meets test targeting criteria
Check visitor enrollment:
- Not all visitors are enrolled immediately
- Test targeting rules may exclude certain visitors
If Events Are Firing Multiple Times
Check for duplicate code:
- Ensure integration code is only added once
- Remove any duplicate script tags or inclusions
Our list of integrations is updating weekly. If you want to know if we integrate with your preferred platform, please get in touch with us here.